How Endex and Endex Plus Work & Basic Procedure  
 
Here is how the Endex and Endex Plus work:

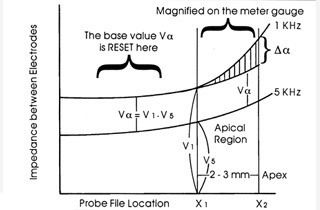
The Endex Plus and Endex operate on the principle that impedance measurements between two electrodes differs depending on the frequencies used, and differ greatly at apical constriction regions. 

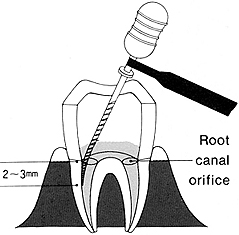
Using an initial reading at the middle of each canal as a reference (Reset about 2 to 3 mm from the canal orifice), the Endex Plus and Endex monitor the changes in impedances at 5kHz and 1kHz as the file probe approaches the apex. The critical apical region is magnified and indicated on the panel meter and by an audio alarm.

Endex Chart
The Plus feature added to the Endex:

While the Manual Reset method (used in the original Endex) is the most accurate method capable of measuring even difficult cases (such as a widely open or perforated tooth), the Endex Plus can give a quick Automatic Reset as soon as the switch is turned on.

What is the Endex Plus indicating?

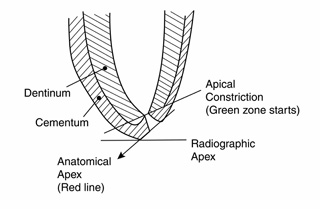
The Red line on the needle meter indicates the Anatomical Apex, and the Green zone approximately indicates the initial apical constriction.  The meter magnifies the area of the apical region about 3 mm from the Apex when the Endex has been reset (auto or manual).
 

Impedance Chart
Basic Procedure Utilizing the Auto Reset and the Manual Reset Modes:
  1. Prepare the Canal by adding a few drops of good conducting fluid such as saline or sodium hypochlorite into the canal.  Excess fluid should be reduced to isolate the canal. 
  2. Place a Lip Clip (attached to the red end of the main cord) onto the corner of the patient's lip. Connect the File-End Probe Cord with a hand file to the black end of the main cord. 
  3. Place the Probe File into the middle of the canal (2-3 mm) and maintain this file position in the canal for Step 4. 
Apical Diagram
>>>  for Auto Reset Mode, proceed to step 4A. For Manual Reset Mode, proceed to step 4M.  <<<
  1. A - Auto Reset Mode
  • Turn the Mode Switch DOWN to Auto Reset Mode.
  • While you hold the file in the canal, depress the Main Switch to turn the power on .
  • The BLUE LAMP LIGHTS when the AUTOMATIC RESET is completed.
  • The needle will swing a little and settle at or near the RESET LINE.
  • If RESET ACTION in Auto Mode is hesitant, try twisting the file a little, or moving it up or down slightly.
  1. M - Manual Reset Mode
  • Turn the Mode Switch UP to Manual Reset Mode with the main switch on.
  • Push the Reset Button located above the Mode Switch.

  • GREEN LAMP LIGHTS when the MANUAL RESET is completed.
When the Reset is completed with either Blue Auto Light or Green Manual Light, 
you are ready to read the measurement at the Apical Region:
  1. Slowly advance the probe file toward the apex, touching the canal wall or fluid.  At first the needle moves very little until the probe reaches about 3 mm from the Apex.
  2. At the beginning of the GREEN ZONE the intermittent alarm begins, indicating it has reached the apical constriction area (about 0.7 mm from the Anatomical Apex). 
  3. When the anatomical apex is reached (Red Line) the sustained alarm sounds. 
  • The reset memory for the canal being measured remains until the Main Switch is turned off.
  • If an Auto Reset is taken inadvertently (or in an undesirable position), turn off the main switch and turn it back on when the file is properly placed in the canal. 

 
Basic Endex Procedure:
 
  1. ENDEX SET UP: Turn on ENDEX and check the pilot lamp for battery condition. Attach a hand K-file or reamer (#8 to #15) with a marker on the File Clip and place the Lip Clip on the patient's lip. Canal readings are not affected by probe file size, though a larger file should be used when the canal size is over #45 file.
 
  1. PREPARATION OF CANAL: While ENDEX produces accurate readings in any moist canal, the ideal condition for precise ENDEX readings is to cover the cervix with a good conducting fluid such as saline or sodium hypochlorite. Existing conditions with pus, blood, etc. in the canal may be easily improved with the addition of such fluid. Excess irrigant in the canal should be reduced to isolate the electrode (inside the root canal) from tissue or fluid outside the canal. 
  1. BASE SETTING: insert the file probe about 2 to 3 mm below the cervix (root canal orifice), placing it against the canal wall. Push the Reset Button on ENDEX to set the reference reading. The needle on the gauge will swing once and settle at the RESET arrow.
  1. READINGS AT THE APICAL REGION: As the probe file is slowly advanced toward the apex, the meter needle moves toward the Green Zone. The audio alarm beeps intermittently in the Green Zone, beginning approximately 0.7 mm from an apical restriction. The position of the probe file at the apical region is magnified in the Green Zone and indicated with the needle on the gauge. At the APEX (Yellow Zone) the audio alarm changes to a sustained sound.
  1. DETERMINE THE WORKING LENGTH: Set the marker on the K-file. Remove the file, and measure the length from the marker to determine the working length.

Endex Main Page - How Endex and Endex Plus Work & Basic Procedure

Maintenance and Repairs