LHP-6 LABORATORY HANDPIECE MAINTENANCE
Consisting of LHP-6/L5M/MCC6
Use a sufficient vacuum system during laboratory work and practice the following maintenance procedures using the enclosed 5-piece tool kit to keep your handpiece in good working condition.
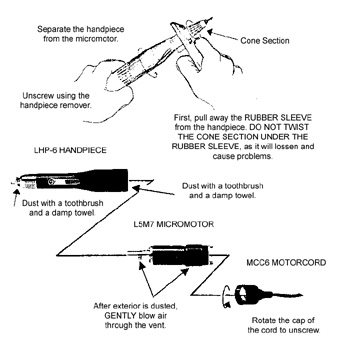
1. DUST DAILY
Using the accessory brush (or a toothbrush) and a damp towel, clean all surfaces of the separated handpiece, micromotor, and cord.
The vented area of the micromotor and the tip of the handpiece may be dusted occasionally with gentle air blowing after surface dusting.
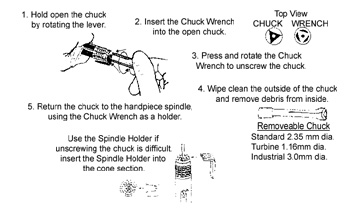
2. WEEKLY CHUCK CLEANING
Using the Chuck Wrench and optional spindle Holder, remove the chuck from the handpiece; clean the chuck and the hole in the spindle. Using the Chuck Wrench screw the chuck back into the spindle firmly to obtain full chucking power and a proper chucking mechanism. Replace a weak chuck; replacement chucks are available for $30 in three diameter sizes.
3. SEND IN YOUR HANDPIECE ASSEMBLY TO OSADA, IN LOS ANGELES, FOR A COMPLETE CHECK-UP IF: (Please include cord)
A. The carbon brushes wear out (irregular/intermittent speed or no rotation).
B. The handpiece assembly is noisy or heats-up.
C. The chucking mechanism is irregular or hard.
NOTE: After repairs, it is normal for the handpiece to feel warmer than usual. New bearings require a short break-in period before settling into proper operating position. Please use caution during this perod not to overheat or exert excessive pressure on the handpiece.
On all repaired handpieces, we have added Osada's new LAB SLEEVE. This rubber sleeve provides additional protectiion and comfort. Modify it as needed, as the material is easy to work with and is washable.
Laboratory Handpiece
Assembly Main Page
LHP-6
Maintenance Instructions -
LHPM Maintenance Instructions