| Home Warranty/Repair VideosContact Us |


|
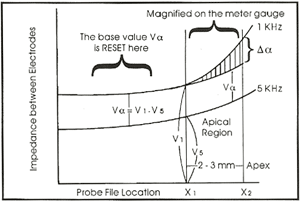
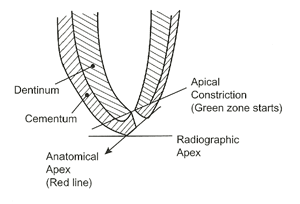
The Endex Plus operates on the principle that impedance measurements between electrodes differ depending on frequencies used, and differ greatly at apical constriction regions. Using an initial reading (Reset) at the middle of each cancal (about 2 to 3 mm from the root canal orifice) as a reference, the Endex Plus evaluates by monitoring the changes in impedances at 5 KHz and 1 KHz, as the file probe approaches the apex. The critical apical region is magnified and shown n the panel meter and by audio alarm. Endex Plus Features The Manual Reset method (as the method of the Endex) is the most accurate method capable of measuring even difficult cases (such as a widely open or perforated tooth). Endex Plus can give a quick Automatic Reset as soon as the switch is turned on. What does Endex Plus Show? The Red line on the needle meter indicates the Anatomical Apex, and the Green zone starts approximately the apical constriction. The meter magnifies the apical region of about 3 mm from the Apex when the reset line is defined with auto or manual reset method. |
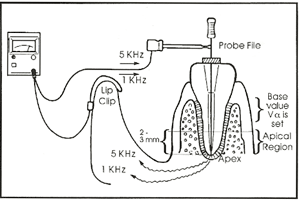  |
2. Place Lip Clip - (attached to the red end of the main cord) onto the corner of the patient's lip. Connect the File-End Probe Cord with a hand file to the black end of the main cord. 3. Place a Probe File - into the middle of the canal (2 - 3 mm) and maintain this file position in the canal for Step 4. Choose Auto or Manual Reset for Step 4: 4. AUTO RESET
4. MANUAL RESET When the Reset is completed with either the Blue Auto Light or the Green Manual Light, you are ready to read the measurement at the Apical Region. 5. Slowly advance the Probe File - toward the Apex, touching the canal wall or fluid. At first the needle moves very little until the probe reaches about 3 mm from the Apex. 6. At the beginning of the Green Zone, the intermittent alarm begins, indicating it has reached the apical constriction area (about 0.7 mm from the Anatomical Apex). 7. When the Anatomical Apex is reached (Red Line), the sustained alarm sounds. The reset memory remains for the canal being measured until the Main Switch is turned off. If an Auto Reset is taken inadvertently (or in an undesirable position), turn off the main switch and turn in back on when the file is properly placed in the canal. | |||
|
|
 1. Prepare the Canal
3637 Motor Ave., Suite 380 | Los Angeles, CA 90034
(800) 426-7232 | (310) 841-2220 | Fax (310) 841-2221
Website by UmeWorks, LLC